Monday, December 27, 2010

Use PageRank to Detect Fraud Website - Secure Web Browsing

One of the very useful ways to check whether a web site is reliable (such as is this website a fraud website?), I always use the page rank to determine them. PageRank is the Google’s view of the importance of the page and it gives the ranking from 0 to 10.

Those fraud websites are usually new and have no PageRank (i.e. grey out) or have PageRank “0”.  So, what I usually do is I check the PageRank of those website whenever I have doubts (such as bank website and etc.) If you go to any bank website that has no PageRank or PageRank “0”, you may need to be be careful as those website are usually fraud.


 You can see the PageRank of each website using the “Google Toolbar”. Check out my previous post on how to use and install the Google Toolbar in your browser. Most famous website (such as bank or large corporation) usually have PageRank > 5. Just move your mouse cursor over to the PageRank bar (in green color), it shows you the PageRank of the current page. Of course, please wait until the web page is finished loading.

This is what I call secure web browsing using PageRank. Good luck & happy browsing!

Thursday, November 11, 2010

Unable to Install Real Player 11 – Workaround

If you download the real player 11 from the official website, it is very funny that when you click “accept” during the real player 11 installation and it nothing happens. I thought this is a bug that Real Player will fix this very soon and it doesn't seem so. When I search through the web and it seems like some people do have this problem and do not have the solution.

So, the temporarily workaround is to download the full real player software version from filehippo.com and I tried it works. Click here to download the Real Player 11 from filehippo.com

Saturday, November 6, 2010

Windows Movie Maker is Not Available in Windows 7

Very funny that Windows 7 has removed this Windows Movie Maker by default. I guess the reason is MS now package this fella as part of the Windows Live Essentials. Therefore, it is now called Windows “Live” Movie Maker. As usual, Microsoft likes to change their products name….

To check whether you have already installed Windows live Movie Maker in Windows 7, just go to the Start Button and key-in “Movie Maker” . If the “Windows Live Movie Maker” program appears, then you already have that installed in your Windows 7. If no, you will need to download and install it from here: Windows Live Movie Maker.

See one of my creations here! Of course this is the simple form of movie making but it is good enough for me. Enjoy! :)

Sunday, October 17, 2010

Insert Table with Windows Live Writer for Your Blog

I used to write my blog post in MS word, then OpenOffice writer and later on write directly in the Blogger platform itself.  However, there is one common problem with all these methods is that to insert a table into my blog post is always troublesome. Whatever the table that I created in either word or OpenOffice, I can’t port it over to my blogspot. The copy & paste just doesn’t work or it doesn’t show up exactly the one I expected. Converting to HTML doesn’t work either. Not to talk about the blogger platform which there is no way for you to insert a table at all!

Well of course the workaround I used to do is write the HTML code directly for table. Nowadays, do we really still need to code in HTML code? So I found the best reliable to use the Windows Live Writer which generates the exactly basic table HTML code. This is exactly what I”m looking for that which is kind of simple in fact.

Windows Live Writer is completely free from Microsoft and I find it the very useful and simple enough to use.  I start using it to write my draft, then later on port it over to my blogging platform. The thing I don’t really comfortable with is the “Publish” feature which allows you to publish directly to your blogging platform. It requires you to enter your “password” of your blogging platform which I don’t really trust Microsoft on this. Therefore, I don’t really use it to publish my post and  instead I manually port it over to my blogging platform. Do I use it the wrong way?

You can download Windows Live Writer here.


Few Notes: 

  • Windows Live writer won’t allow you start writing your draft until you link your blog account. Since I don’t like the “Publish” feature, what I did is to simply register the Windows Live ID. Go to “Blogs” –> “Add Blog Account…” and select “I don’t have a blog; create one Windows Live for me”. Click next and follow the on-screen instructions.
  • After I write my draft or insert my table (in “Edit” tab at below), I click the the “Source” tab to view the raw HTML format. I will then just copy & paste this HTML code into my blogging platform. This is as simple as that.
  • You need to click on the “Save draft” after you write your content. To retrieve your draft, you just need to click on the upper right of the windows.

P/S: I still do it manually for inserting the picture and image into the blogger platform which I’m perfectly fine with it. However if you use the “Publish” feature, this should be fine and you do not need to manually upload your picture. I also use Windows Live Writer to write my blog post content offline. This is very useful especially when I”m traveling to China where a lot of websites are blocked (e.g. blogger.com is one of them).

Sunday, October 3, 2010

Disable Useless LinkScanner in AVG

The LinkScanner feature in the AVG is a completely useless feature in my opinion. It doesn’t help at all but instead making your browser super slow! You have 2 options:


Option 1: Disable the LinkScanner feature

  • Double click the AVG icon on your lower right.
  • Click on the “Link Scanner” and you will see the following page
  • Uncheck “Enable AVG Search-Shield”, “AVG Active Surf-Shield”
Note: The drawback with this option is your will see the warning sign in the AVG icon mentions that your system is not fully protected. This is fine if you’re okay with this. If you don’t like the warning, then you can try the option 2 below.


Option 2: Disable the add-on in your browser

For Firefox:
  • Go to “Tools –> Ad-ons” and you see the following screen.
  • Look for the “AVG Safe Search” and click “Disable”

    For Internet Explorer:
    • Go to “Tools –> Manage Ad-ons” and you see the following screen.
    • Look for the “AVG Safe Search” under AVG Technologies and click on “Disable” button.
      Note: This option is preferable if you hate the warning AVG icon on lower right windows bar.

      P/S: I will suggest AVG to completely remove this useless feature and I don’t think that is not really necessary but will only make the browser runs slower. Having the “Resident Shield” is good enough…

      Sunday, September 26, 2010

      Using MSconfig for Selective Startup in Your Windows

      One of the key reasons why your windows is running extremely slow is because you load too many programs during your windows startup that you may not aware at all. MSconfig or System Configuration tool is the most useful software that comes together with windows that allows you to choose what startup programs that you would like to run.


      Steps to Run System Configuration Tool

      (1) Click “Start” and key in the “msconfig” to run program directly or go to “Start” –> “Control Panel” –> “System and Maitenance” –> “Administrative Tools” –>  “System Configuration”. You will see the following screen:


      (2) Click on the ‘Services” tab and disable the services that you do not like to run in your PC. You need to look at each services and understand the purpose of this services. You can “Google them” to find out more about their purpuse to run at the background. For myself, I list down some examples of services that I disable:
      • AVG Free E-mail Scanner (Since I don’t use external email programs 
      • AMD External Events Utility (For Hotkeys which is not necessary)
      Note: This is the advanced usage. Please make sure you restart your PC to make sure you don’t screw up everything. If really so, load the windows in safe mode and enable back the services. 

       
      (3) Click on the “Startup” tab and disable the startup programs that you do not like to run. Again, you need to look at each start up programs and decide whether you really still need them in startup. This is some examples of the startup programs that I disable:
      • Adobe Reader and Acrobat Manager (it is usually no needed – same to MS office startup programs that usually is useless to put them into the startup) 
      • Adobe Acrobat (Same with the reason above - it usually loads in startup for loading the application faster later on) 
      • Dell Support Center Updates, Google Update, Java Platform SE Auto Updater (any auto update programs that you think are not needed) 
      • Catalyst Control Center (graphic configuration that I think I can load it manually if I want to)
      • GoogleToolbarNotifier (a program that run all the time to make sure you Google is always your default search engine which is not needed at all) 
      • Synaptics Pointing Device Driver (It is my touch pad driver and I don’t feel any different if I disable it)
      Note: Of course you will find more startup programs to disable but please make sure you restart your PC to make sure you don’t screw up everything. If really so, load the windows in safe mode and enable back the startup programs.

      P/S: By the way this is the advance usage to selective disable the services and startup programs. The simple way before you start doing this is, you should uninstall any unnecessary programs in your system. For example, your laptop which comes together with those trail version of application or pre-install useless application from the vendor (e.g. Dell) and if you don’t need them, you should uninstall all of them. Good luck!

      Sunday, September 19, 2010

      Best Way to Convert Word Document To PDF – OpenOffice

      There are a lot of of freeware out there to convert your existing MS Word document to Adobe PDF but I found that the easiest way is to use the OpenOffice. What you need to do is to open the MS Word with the OpenOffice Writer tool and export it to PDF. That’s it!


      Steps to Export to PDF

      (1) Open Your MS Word document with OpenOffice Writer
      (2) Go to “File” -> “Export as PDF…” You will see the following screen:


      (3) You can play around with plenty of options here or just let it be the default option.
      (4) Click “Export” button to generate the PDF.


      Useful Export PDF Options

      Wait a minute! There are few things that I think that might be useful to you.
      • Export Note: This is especially useful if you want to retain the notes in your slides
      • Set Permission Password: This is probably the key reason why people wants to convert their document to PDF. Yes, security! You don’t want people can simply copy your content. Here is the place you set the security in the “Security Tab” while you’re exporting your document to PDF. 
      Note: Set Open Password is used to encrypt your PDF so it can't be open at all. I don't think this is something common people will usually do.

      Steps to Setup the Permission

      (1) Click on “Security” tab in the PDF Options while you’re exporting your document to PDF
      (2) Click on “Set permission password”. Follow the on-screen instruction to set the password.
      (3) After that, you will see the screen below. Of course the highest level of security is to:
      • Set “Not Permitted” in the changes options - NOT allow to made changes.
      • Uncheck/unselect “Enable copying of content” - NOT allow to copy.
      • Uncheck/unselect “Enable text access for accessibility tool” - NOT really sure what this is but it seems like same with above (which is not allow you to copy).

      P/S: Hope this is useful to you especially the security feature. I have tried it myself and it is pretty simple. Oh yes, this is completely FREE too. You can download OpenOffice here. Have fun!

      Sunday, August 1, 2010

      Increase Internet Speed by Changing DNS Server - namebench

      Have you ever wondered why your web browser always hangs when you enter the wrong URL address? The reason is your web browser keep looking for the IP address of the URL from the DNS server but the IP address cannot be resolved.

      As long as you type in the URL address (e.g. www.google.com), the DNS server will try to resolved it to the actual IP address (e.g. 64.233.181.104). Therefore if your DNS server's respond is low, it takes longer to resolve the IP address and eventually this causes your overall internet connection becomes slower.

      Usually people will suggest you to use the Google DNS server (i.e. 8.8.8.8 or 8.8.4.4) as it is believed the fastest DNS server. Is that true? The "namebench" is the software / freeware to tell you to the answer!

      Let's try it out:

      • Download "namebench" here.
      • Install for Windows or Mac version.
      • Run the application and you will see the following screen.
      • Let's everything to be default (it detects your location automatically). If the location is not correct, you can change it. Click "Start Benchmark".

      As you can see from the result, the Google Public DNS is 215% faster than my default DNS server. That is really awesome. Google rocks! 

      These are the suggested DNS server that you will need set in your system:
      • Primary Server - 8.8.4.4 (Secondary Google Public DNS Server)
      • Secondary Server - 202.188.0.133 (Primary Streamyx DNS server)
      • Tertiary Server - 202.188.1.5 (Secondary Streamyx DNS server)
      Follow the instruction here to change DNS server for your operating system: Changing DNS Server


      Some Notes/Tips: . 
      1. For preferred DNS server in Windows, put the suggested primary server by namebench. For alternate DNS server, put the suggested secondary server by namebench.
      2. If you connect your PC or laptop through both LAN and Wireless network, you need to apply the setting to both network(i.e.Wireless and LAN). Basically you need to apply the setting to each of the network (i.e. wireless, LAN and dial-up connection).
      Does this help? I hope so...

      Saturday, July 24, 2010

      Disable Useless HTC Application for Faster Performance - HTC Diamond 2

      In my previous post, I talked about the Best Tweaking Methods to Improve HTC Devices Performance (specifically for HTC Touch Cruise) which may no longer applicable anymore for the latest HTC devices which use HTC Sense (e.g. HTC diamond 2). One exception is that "Disable the Clear Text Fonts" is still useful for increasing your Windows Mobile's performance.

      This post talks about the simplest ways to increase your HTC devices performance by disabling those HTC applications that you rarely use in the HTC Sense (i.e. the HTC's GUI).


      (1) Disable HTC Weather Wallpaper Animation.


      Although the HTC weather animation looks really cool especially when you turn on your mobile, it is also the slowest HTC application that eventually slow down your entire HTC device's performance. Have you ever realized your "Digital Clock" is still flipping extremely slow while you turn on your mobile?  Yes, that is all caused by the HTC weather animation. Once you disable the animation, everything should be fine.


      To disable the HTC weather animation:
      • Scroll to "Setting" at the most right of the scroll bar.
      • Click on "Personalize" -> "Home tab wallpaper" -> "Animated wallpaper"
      • Select any animated wallpaper will do.

      (2) Disable Useless Application in Home Screen Tab

      The optimum performance for the Home Screen Tab is to have 5 HTC application based on my experiment. So, the first tab is "Home" and the last tab is "Setting". So we leave 3 HTC applications to play with. I choose the most frequent used applications which are "People", "Message" and "Photo & Videos" and I disable the rest.


      To disable the rarely used HTC applications:
      • Scroll to "Setting" at the most right of the scroll bar.
      • Click on "Personalize" -> "Home screen tabs"
      • Un-select any applications that is useless (or rarely used) to you.
      P/S: Disable HTC calender in the Home Screen Tab is a MUST. See my explanation below:


      (3) Disable HTC Calender Application is a MUST

      HTC Calender application is probably the stupidest application that has ever been designed by HTC. This application is built on top of the default Calender application in Windows Mobile and runs extremely slow while loading your appointment or agenda in your calender (in the Agenda view). So what you really need to do is to disable this useless HTC calender in thee Home Screen Tab - follow the instructions above.


      P/S: I didn't show the agenda view because of privacy. :D. The "Agenda View" in HTC calender really sucks! From the home screen, you still can access your calender by clicking on the "Calender" in the middle of the screen and it will bring you the "Default Calender" in Windows Mobile. This default calender runs way faster than the stupid useless HTC calender.

      Saturday, July 10, 2010

      Free Alarm Clock for PC (Windows)

      I used to use my phone as an alarm clock until recently I sent my phone to service center. So, I was trying to search for a free alarm clock for PC and I found one!

      It is pretty a very simple program and simple GUI. Let's look at the GUI below:


      For me the most useful is the Single Alarm, so I just check it and click the "Set Alarms". That's IT! So easy. However, one thing that you may want make sure is your PC won't go into sleep mode after some idle time or else this Alarm Clock won't help.

      You need to change your power options (based on Windows 7):

      1. Go to "Start" menu then "Control Panel"
      2. Go to "System and Security"
      3. Go to "Power Option"
      4. Click "Change Plan Setting" regardless of your setting is "Balanced" or "High Performance"
      5. Make sure the value for "Put the computer to sleep" is set to "Never".


      It is a freeware and I hope you will find this free alarm clock useful. To download this Alarm Clock, click here.

      p/s: Of course if you're using laptop, you need to plugged in your laptop to power or else your laptop may just run out of battery.

      Sunday, May 9, 2010

      Zoom In and Zoom out with Web Browser

      I recently talked to a friend who very pissed off with the font size of a website. He was surprised when I showed him that the web browsers (whether is Firefox, Internet Explorer or Google Chrome) in fact already have the build-in feature to allow you to zoom-in and zoom-out from a web page. I'm not sure about Safari but I suspect it should have a similar feature.


      How to Zoom In and Zoom Out?

      • Zoom-In: Press and Hold "Ctrl" & "+" button or Press "Ctrl" & move "Mouse wheel Up"
      • Zoom-Out: Press and Hold "Ctrl" & "-" button or Press "Ctrl" & move "Mouse wheel Down" 
      To reset to original default zoom, you need to press and hold "Ctrl" & "0".  All these work for Firefox, IE and Google Chrome except for "Ctrl" & "+" in Google Chrome. It somehow doesn't work in Google Chrome. Perhaps this is the bug in Google Chrome?

      Hope this helps. It used to require to install plug-in to use this feature and now no longer needed anymore. :)

      Saturday, May 1, 2010

      Detect Duplicate Content with Copyscape

      Copyscape is so far the best tool (it is a website) I have ever used to help detecting duplicate content of your website. I've been using this tool since I started blogging in few years and recently they made a video of it so now you can watch the following video for the introduction of Copyscape:


      This is usually how I will you use the Copyscape once in a while to detect any losers trying to steal my content. Of course I used it for free without paying anything. This is what I did recently:


      (1) I visited Copyscape and entered "http://softwaretracker.blogspot.com"

      (2) I found this loser - Windvis.com. As you can see in the following page, it is the 100% exactly the same content of my previous post - Best 3D Chat Software - IMVU 

      (3) I clicked on "Visit this page" to visit this fella to confirm and verify the page. I also clicked on the "See whois info" to see who the hell this fella is


      (4) I sent an email to this fella with the tittle - "Urgent: Copyright infringement on your website (www.windvis.com)". I politely asked him to remove the content immediately and if possible without forcing me to file DMCA complaint with his web host.

      It used to work for me previously and usually the webmaster will just take it off from their website. However I visited the page, the stealing content is still there after a week. Hopefully they will remove it soon.

      P/S: What really surprise me is that  Google gives this website Page Rank 3? Wake up, Google! :) I think the search engine should be smart enough to detect plagiarism. What do you think?

      Saturday, April 17, 2010

      Best Free 3D Chat Room - IMVU

      I used to play mIRC (i.e. internet relay chat) and I guess now somehow is no longer popular anymore and most importantly it is no longer available for free. No wonder I have never heard of people talk about it anymore. Perhaps I'm from just an outdated person from older generation. It was in fact similar to "Facebook" today and used to be very well known to almost everyone.

      So I tried to search around the web and looked for best chat room. In past couple of months, I actually found one which I think so far is the best chat room among couple of chat rooms I had tried. This software is called IMVU. I'm not sure exactly what it stands for but people say it stands for "Instant Messaging Virtual Universal"?


      Steps to Install IMVU

      1. Go to IMVU
      2. Click "Start Now"
      3. Follow the on-screen instructions.
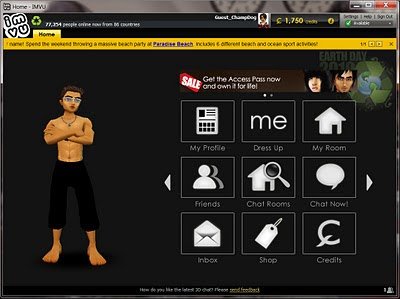
      Once you have installed the software, you can now login to IMVU and you will see the following screen:


      I think I do not need to explain every single options because most of them are self-explanatory. This is why I think this software is so successful - very user friendly. I'm really impressed by the 3D effect in this software too. It is really awesome. Check it out yourself:


      I will say IMVU is the so far the most successful software to emulate the world. It is the best virtual world software that I've ever seen. It is almost very closed to the actual real world. Therefore, I don't surprise if people are getting addicted to it and prefer this virtual world rather than the real world.

      There are few "Advanced Features" that you need to "PAY" for it to enable it. Well, I personally don't think that you need to go to that extend but it is really up to you. Have fun with it!

      Saturday, April 10, 2010

      Best Free Creative Flash Games

      This is the best creative flash games that I have ever seen so far and it is completely FREE. Let's check out the following site which consists a lot of free games which are created using flash:

      Here are some of the few games that I have tried:


      Doggie's Game

      Instructions:
      1. Right click your dog to move forward or backward.
      2. Right click and hold to align all your dogs.
      3. Space bar to instruct all dogs to jump.

      p/s: I love this doggie's game the MOST. I think this what makes me said the most creative flash game! :)


      Monkey's Game

      Instructions:
      1. Right click the monkey to catch the fruits.
      2. Right click the monkey to duck to avoid the bomb.


      p/s: Not really like this but not that bad either...


      Koala's Game

      Instructions:
      1. Move and click around your mouse to avoid the snail.
      2. Click your and hold your koala bear to slide down. Release to stop sliding down.

      p/s: The second game that I like most...


      The thing I like about most of these games is the instructions to play these games are very easy and common-sense. In fact for most of the games, you don't need to read the instruction at all. You can just go ahead to play game directly without reading any instructions. You can just use your common sense will do. I guess that is called "creative". Hope you like some of those games...

      Saturday, March 20, 2010

      Best Software to Organize Your Desktop - Fences

      This is the best free software to help you organize your desktop. This software is extremely useful for those who like to organize their stuff in Windows Desktop. If you are the one who like to create a lot of folders, documents, program shortcuts and many other stuff in your desktop, this software is definitely for you. This software is called "Fence".


      There are the the options that I choose during the installation:
      1. Select "Start Using Fences" in the welcome screen.
      2. Select "Sort out my Icons" in the layout screen.
      After installation, you're required to restart you computers and you will see the following "Fences" in your desktop such as QuickLinks, Files & Documents, Recent Things, Programs, Web Links and Folders.


      Notes: Please take note that this software only reogranize your stuff in the desktop. It is not as smart as you think. For example:
      • "Recent Things" is not auto. It is probably auto for the first time installation to give you a kick start to organize your desktop.
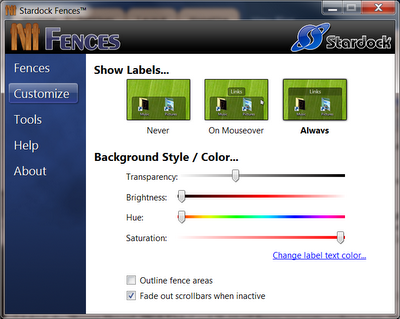
      You can re-size the "Fence" and move around them in the desktop. However if your background is black for example, you may not able to see the "Fence" at all. In this case it is very hard for you to move around and re-size them. What you need to do is change the "Background Style & Color":
      • Right click your Desktop and click "Configure Fences..."
      • Go to "Customize" and increase the "Brightness"

      Once I have done moving around the fences, I usually revert back to original as I prefer the "Fences" to be invisible. :)

      I think the "Recent Things", "Web Links" and "Folders" fences are pretty useless to me. Therefore, I have removed them and create my own fences such as "QuickLinks", "Tools & Utilities", "Programs", "Games", "File & Documents" and "Unused Programs".You can play around with your own...

      P/S: I don't really put a lot of stuff in my desktop. Perhaps with this software, I should change my mind?

      Saturday, February 27, 2010

      Enable HTTP Pipelining to Increase Firefox Speed

      If your Firefox browser is too slow especially when you open many tabs at one time, you can consider to enable the HTTP pipelining feature in the browser. By default, this feature is turned off and you have to manually tweak the browser configuration to enable it.

      Steps to Enable HTTP Pipelining:

      • Enter “about:config” at the address bar and press enter. You will see the following screen. So click “I'll be care, I promise”.


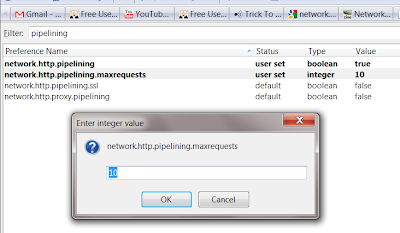
      • In the filter box, type “pipelining” and you will see the following screen.


      • Double-click the “network.http.pipelining”, it will be changed from the default “false” to “true”. Double-click again will change back to “false”. Since you want to enable the “http pipelining”, you make sure the value is “true”.
      • Double-click the “network.http.pipelining.maxrequests” and change the default value 4 to 8 .
      • Click OK and close the page.
      [Updated on 18 April 2010]
      The supported maximum value for pipelining request in firefox is 8 - change 10 to 8.

      Note: Why 8? It is up to you to set the value. If the value is too high, it probably will hurts more and cause more delays. 10 is just a recommended value that I play around with and it seems pretty cool. Of course, you can play around with your own number to optimize your browser's speed.

      In short, HTTP pipeling is a HTTP protocol that does not required the client to wait for the server to respond and keep sending the request. Because there are some delays waiting the respond from the server, enabling this HTTP feature can actually speed up the browser's page loading speed. To know more about HTTP pipelining, you can visit here.

      Sunday, February 7, 2010

      Increase Firefox Browsing Speed with AdBlock Plus

      The most safest way (without registry tweaking) to increase the speed of your web browsing experience is to disable all those advertisements. The Addon “AdBlock Plus” does all that for you! I strongly recommend you to install this add-on in your Firefox for fastest browsing experience.

      Without AdBlock Plus


      With AdBlock Plus


      As you can see, with the AdBlock Plus add on, the advertisements in this blog has been disabled and the most important thing is the actual content is still displayed properly without any errors.

      The speed difference is obvious and significant if you visit those sites that have very heavy advertisements. Of course for my blog, you can NOT see any differences. So for the site like my blog, you can safely disable the AdBlock plus. :D Just kidding ... Anyway, you can still disable AdBlock Plus for certain website.

      On the top right, click on the “ABP” and 2 most actions that I usually use are:
      • Open Blockable Items – To see how many advertisements scripts have been blocked. You will be surprised with the number of block items...
      • Disable on XXX page – For example, I disable that for all my blogs. :) Maybe you can do the same as well? Hahaha...


      For the rest of the option, you can play around with that but usually you just leave it to default is good enough. Have fun!

      To install this AdBlock Plus add-on, click here. You can also visit the official website here for latest development and discussion.

      Sunday, January 17, 2010

      Missing Owner Information in WM6.5

      A very funny thing about recent Windows Mobile 6.5 is that the "Owner Information" setting is no longer there anymore. You can't add or view your owner information in your mobile. What a crap? Luckily there is still workaround...


      How to Add or View Owner Information?

      (1) Go to Setting and Click "Today"


      (2) In the "Today" Setting, click on "Items". Select "Owner Info" check box item and de-select the rest. Make sure you remember your original checked items.


      (3) Go to your mobile "Home". Click on the "Owner Information"


      (4) Now you can view or add your "Owner Information" into your mobile.


      (5) Go back to "Today" setting and revert back your original setting.

      In some applications, it requires you to put in the owner information. In this case, you can do exactly the steps above to retrieve the owner information. I hope this post is useful.


      Didn't find what you want? Use Google Search Engine below: